
Oracle Database is a widely used relational database management system (RDBMS) known for its reliability, performance, and advanced security features. It supports large-scale transaction processing, data warehousing, and analytics workloads. Oracle offers extensive SQL capabilities, support for PL/SQL, and options for clustering and high availability. Many organizations rely on Oracle as a centralized source of truth for mission-critical business data and reporting
When setting up an Oracle connection in Databox, you'll first choose whether you're connecting an Autonomous Database or a another type of Oracle database. Use the checkbox at the top of the connection form to select the appropriate option.
For Autonomous Database connections, you'll need:
- Username — Oracle user with read access to the database.
- Password — The user's password.
- Connection String (TLS) — The TLS-enabled connection string copied from your Autonomous Database.
- Data source name — A label for the data source in Databox.
- Time zone — The time zone used for interpreting and filtering data points in visualizations.
- In the Oracle Cloud Console, go to Autonomous Database.
- Select your database from the list to open the Details page.
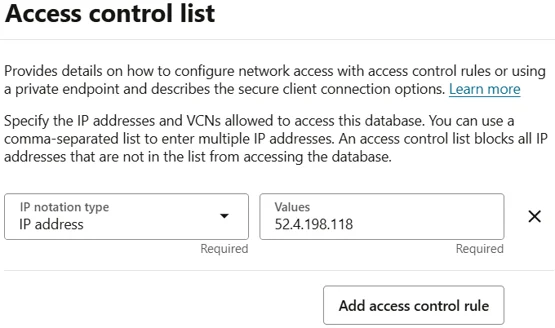
- In Network > Access control list, click Edit.
- Add a new rule for the IP address 52.4.198.118 (Databox IP).
- (Optional) Add your own IP to allow direct access.
- Click Save.
- Wait for the Lifecycle State to change from Updating back to Available.
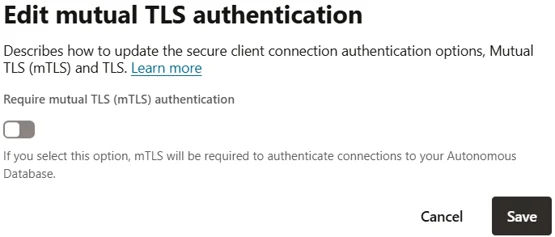
- In Network > Mutual TLS (mTLS) authentication, click Edit.
- Deselect the require Mutual TLS (mTLS) authentication option.
- Click Save.
- Wait for the update to complete (Updating → Available).
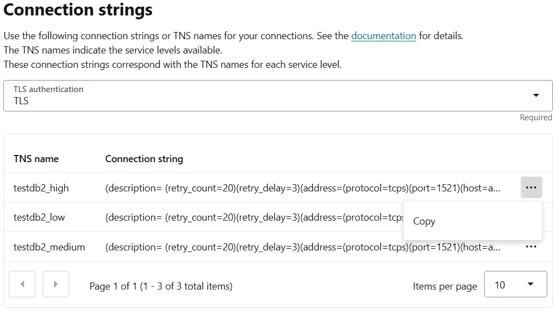
- At the top of the Details page, click Database connection.
- In the Connection strings section, under TLS authentication, select TLS.
- Choose the preferred TNS name, for example:
_low(lowest resource use, for light or infrequent queries)_medium(balanced performance and cost)_high(allocates more resources for heavy queries and reporting)tp/tpurgent(optimized for OLTP workloads, withtpurgentoffering the lowest latency
- Click the … menu next to the chosen TNS name and select Copy to copy the full connection string.
For non-Autonomous Oracle connections, you'll need:
- Host — Server hostname or IP address.
- Port — Default is 1521.
- Service Name — Identifier for your Oracle instance.
- Username — Oracle user with read access to the database.
- Password — The user's password.
- Data source name — A label for the data source in Databox.
- Time zone — The time zone used for interpreting and filtering data points in visualizations.
CREATE USER databox_user IDENTIFIED BY strong_password;
GRANT CREATE SESSION TO databox_user;
GRANT SELECT ON schema.table TO databox_user;The Oracle integration supports the creation of datasets, which allow you to define and shape the specific data you want to use for reporting in Databox. Datasets make it easier to focus on the most relevant information, enabling you to filter, visualize, and analyze metrics across projects, teams, and clients without writing complex queries each time.
- Select a table: Pick the appropriate schema within that database.
- Select columns: Browse and select the specific columns (fields) from your tables or views to include in your dataset. These columns define the structure and content of your dataset.
For more advanced use cases, you can write a custom SQL query instead of selecting columns manually. This allows you to:
- Join multiple tables
- Apply filters and aggregations
- Format or transform data before importing it into Databox
Your query must return a valid tabular result to be used as a dataset.
- Oracle Database Documentation — Central hub for Oracle Database docs, including administration, SQL and PL/SQL references, security, backup & recovery, performance, tools, and release notes.
- Oracle Autonomous Database — Oracle Cloud docs for Autonomous Database: provisioning, connectivity, network access, scaling, administration, data loading, monitoring, and tooling.
For comprehensive details on metrics, data availability, templates, specifications, usage guidelines, and other key information, refer to the resources listed below.


FAQ
Do I need to use a wallet to connect Oracle Autonomous Database to Databox?
No. When using TLS (one-way) connections, no wallet is required.
Which connection string should I use?
Each option represents a different workload profile in Oracle Autonomous Database, and the choice is built into the connection string itself. When you paste a string into Databox, all queries will run under that profile.
If you later decide to use a different profile, you'll need to copy the new connection string from the Oracle Cloud Console and update your Databox connection.


