
Snowflake is a cloud-based data platform designed to handle large-scale structured and semi-structured data for analytics and business intelligence. Unlike traditional on-premise data warehouses, Snowflake separates compute and storage, allowing for high performance, scalability, and concurrency without infrastructure management. It supports SQL querying, data sharing, and native support for formats like JSON, Parquet, and Avro. Snowflake is commonly used by organizations for centralized data warehousing, real-time reporting, and seamless integration with BI tools and data pipelines.
You need the CREATE NETWORK RULE privilege on the schema to create a network rule. By default, only the ACCOUNTADMIN and SECURITYADMIN roles, along with the schema owner, have this privilege.
You can create a network rule using Snowsight by following these steps:
- Sign in to Snowsight using a role with appropriate admin privileges.
- Navigate to Admin > Security.
- Open the Network Rules tab.
- Click + Network Rule to create a new rule.
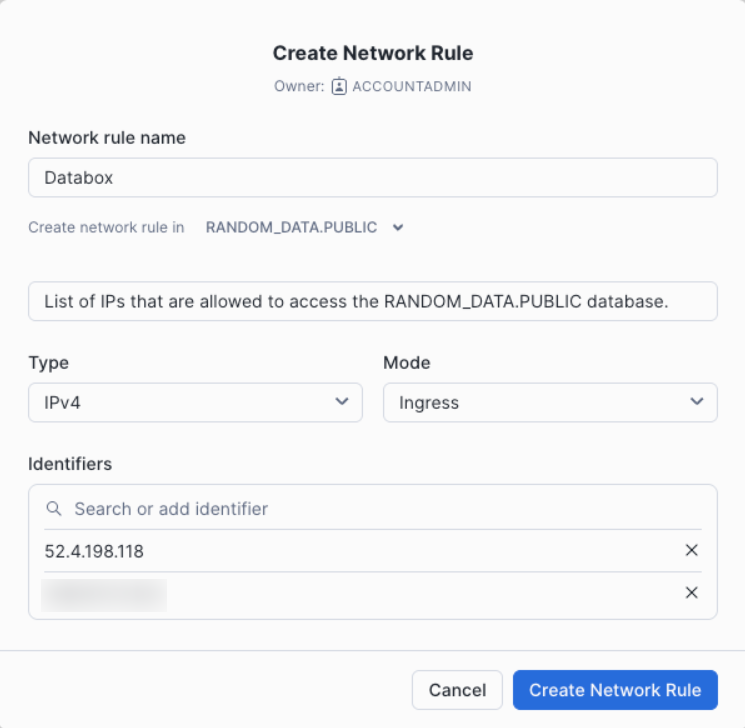
- Enter a name for the network rule.
- Select the schema where the network rule will be stored. (Note: Network rules are schema-level objects.)
- Optionally, add a comment to describe the rule for easier management.
- Set the Type to IPv4.
- Set the Mode to Ingress.
- Under Identifiers, add
52.4.198.118(Databox IP) and your own IP address to ensure you can proceed with the upcoming network policy setup. - Click Create Network Rule to save it.

Only security administrators (i.e. users with the SECURITYADMIN role) or higher or a role with the global CREATE NETWORK POLICY privilege can create network policies. Ownership of a network policy can be transferred to another role.
You can create a network policy using Snowsight by following these steps:
- Sign in to Snowsight using a role with appropriate admin privileges.
- Navigate to Admin > Security.
- Open the Network Policies tab.
- Click + Network Policy to create a new policy.
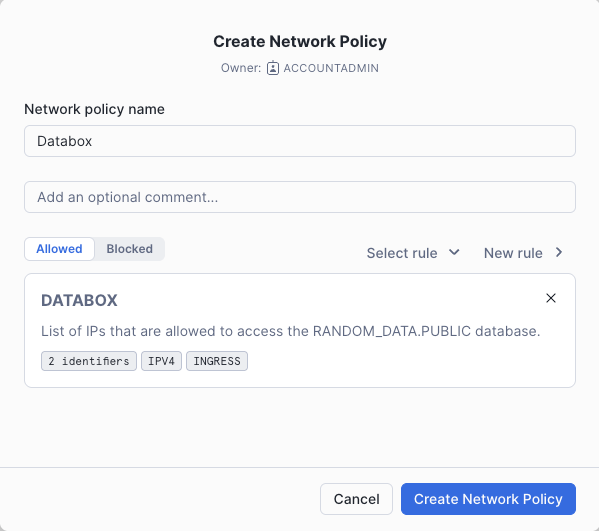
- Enter a name for the network policy.
- Optionally, add a comment to describe the policy for easier management.
- Under Allowed, click Select rule, then choose the network rule you created in Step 1.
- Click Create Network Policy to save it.
After creating the network policy, you need to apply it to your Snowflake account:
- Sign in to Snowsight using a role with appropriate admin privileges.
- Navigate to Admin > Security.
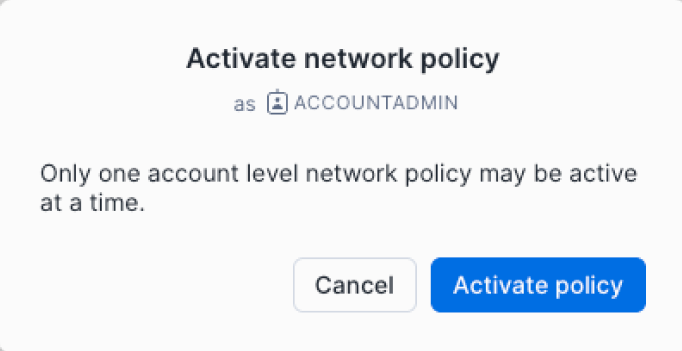
- Open the Network Policies tab and locate the policy you created in Step 2.
- Click the ... (More) menu next to the policy and select Activate On Account.
- Click Activate policy to confirm the action.
You can generate a programmatic access token (PAT) using Snowsight by following these steps:
- Sign in to Snowsight using a role with appropriate admin privileges.
- Navigate to Admin > Users & Roles.
- Select the user for whom you want to generate the token.
- Under the Programmatic access tokens section, click Generate new token.
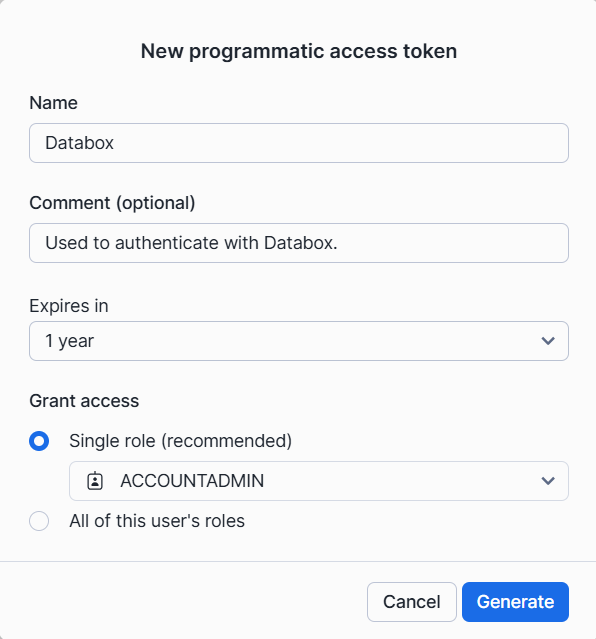
- In the New programmatic access token dialog, fill in the following fields:
- Name: Enter a unique name using only letters, numbers, and underscores. It must start with a letter or underscore. All letters are stored in uppercase.
- Comment (optional): Add a description to help identify the token later. This will appear alongside the token in the list.
- Expires in: Choose how many days the token should remain valid.
- If the user is a service user (i.e. the
USERobject hasTYPE=SERVICE), or if you want to restrict the token's scope, select One specific role (recommended). Then choose the role that should be used for privilege evaluation and object ownership.- When authenticating with this token, the selected role determines which objects the user can access and who owns any objects created.
- Click Create Token to generate it. Make sure to copy the token secret immediately, as it will not be shown again.
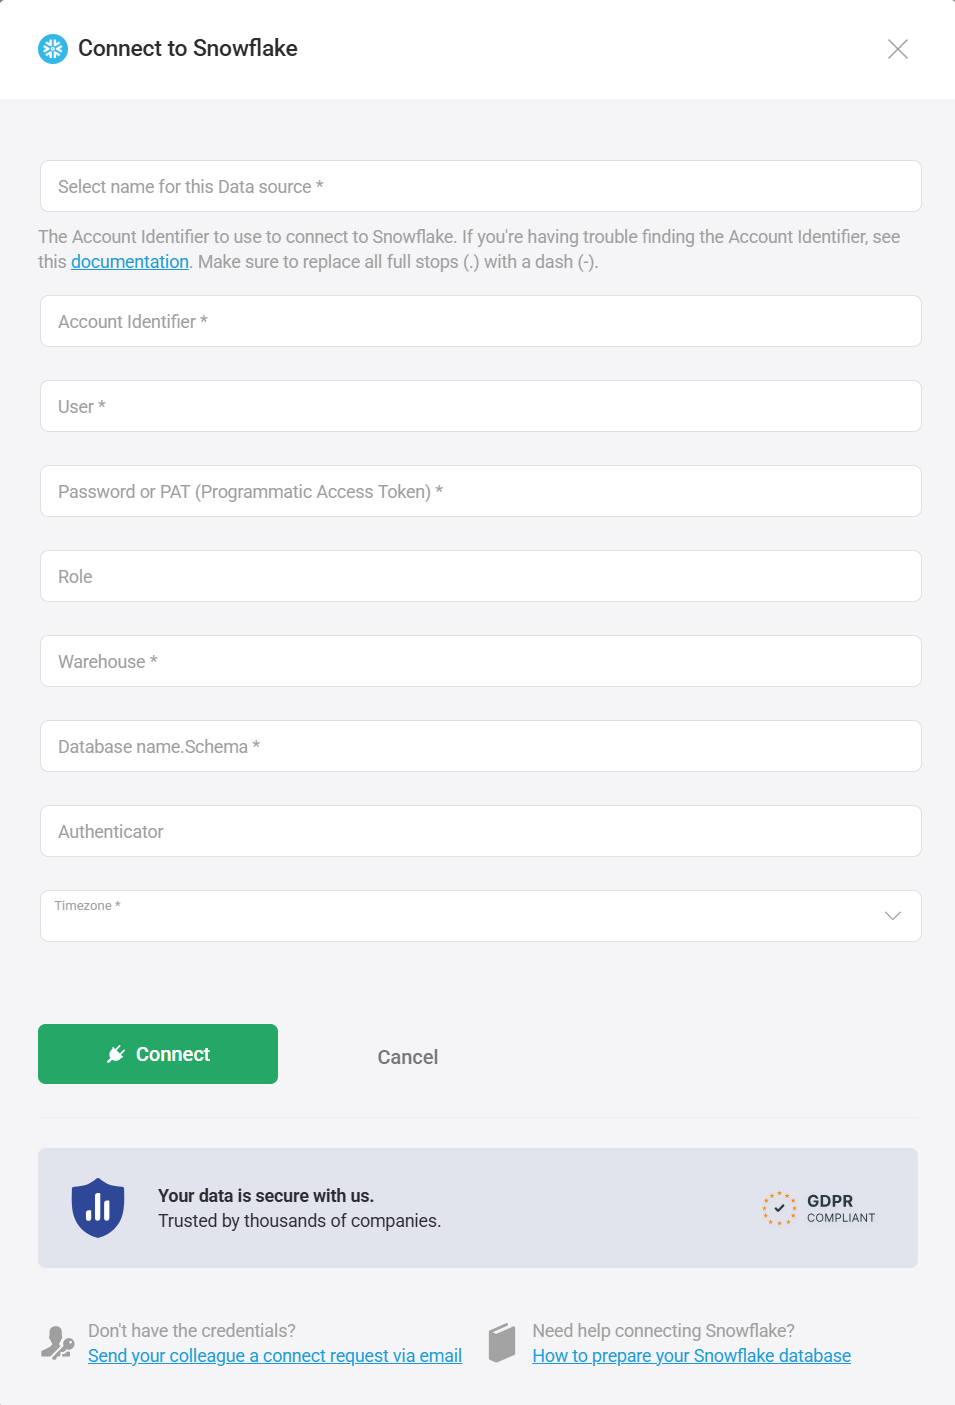
Once you have an active network policy and a valid programmatic access token (PAT), enter the following connection details in Databox to complete the setup:
- Name of the data source (required) — A label for the data source in Databox.
- Account identifier (required) — The organization and account name in the format
ORGNAME-ACCOUNT_NAME. - User (required) — The Snowflake user associated with the PAT.
- Password or PAT (required)— The token secret from the generated PAT in this field.
- Role — Optional. If a specific role was assigned during PAT creation, this field can be left blank.
- This field is part of a legacy configuration and only applies to Snowflake connections created before July 2025.
- Warehouse (required) — The virtual warehouse Databox will use to run queries.
- Database name and schema (required) — A valid database and schema in the format
DATABASE.SCHEMA.- This setting does not limit your access to that specific database or schema. With datasets, Databox can access any database and schema the PAT has permission for.
- Authenticator — The SSO URL configured in your external identity provider (IdP), such as Okta or Azure AD.
- This field is part of a legacy configuration and only applies to Snowflake connections created before July 2025.
- Time zone (required) — The time zone used for interpreting and filtering data points in visualizations.
The Snowflake integration supports the creation of datasets, which allow you to define and shape the specific data you want to use for reporting in Databox. Datasets make it easier to focus on the most relevant information, enabling you to filter, visualize, and analyze metrics across projects, teams, and clients without writing complex queries each time.
- Select a database: Choose the Snowflake database that contains the data you want to work with.
- Select a schema: Pick the appropriate schema within that database.
- Select columns: Browse and select the specific columns (fields) from your tables or views to include in your dataset. These columns define the structure and content of your dataset.
For more advanced use cases, you can write a custom SQL query instead of selecting columns manually. This allows you to:
- Join multiple tables
- Apply filters and aggregations
- Format or transform data before importing it into Databox
Your query must return a valid tabular result to be used as a dataset.
- Snowflake Databases, Tables and Views — Official Snowflake documentation on how to work with databases, schemas, tables, and views.
- Snowflake Queries — Snowflake's guide to writing and optimizing SQL queries, including functions, joins, and filtering best practices.
For comprehensive details on metrics, data availability, templates, specifications, usage guidelines, and other key information, refer to the resources listed below.


FAQ
What's new with the Snowflake integration in 2025?
In 2025, we introduced dataset support for Snowflake. You can now import raw data from your Snowflake account into a reusable dataset and build multiple metrics from it using the metric builder— no need to write separate queries for each metric.
This update also removes per-query row limits. Instead, your data usage is governed by Databox's global dataset size limits, giving you more flexibility when working with larger datasets.
Why should I update my Snowflake connection in Databox?
Starting in August 2025, theSnowflake integration no longer supports standard basic authentication (username and password). All connections must now use programmatic access tokens (PATs), which are entered in place of the password during setup.
As a result, existing connections using basic auth will stop working. To restore connectivity and access new features like datasets, you'll need to update your Snowflake connection using a PAT.


