Guide: Using MySQL with Databox
HOW TO
- Prepare your MySQL Database and Host
- Connect MySQL to Databox
- Use the Metric Builder for MySQL
- Additional Information
- MySQL connections are available on the Professional and higher plans. Request a free trial of MySQL
How to prepare your MySQL Database and Host
IN THIS SECTION
How to prepare your MySQL Database and Host
To prepare our MySQL Database and Host, we'll need to allow remote connections from Databox’s public IP (52.4.198.118) to our Database. The necessary steps to do that will depend on your database, server infrastructure, and firewall. VPC IP must be able to connect to the database port directly.
1. First, we will create a user named "User" with permissions to remotely access the Database called "mydb"GRANT SELECT ON mydb.* TO 'user'@'52.4.198.118' IDENTIFIED BY 'securePassword';
To keep this simple, we have given this user SELECT permission for all Tables in our database. Permission could be given to select from one Table only, or we could create a custom view and give permissions to select from this view only. A basic example of how to achieve this can be found here.
2. By default, our MySQL server will be set to only listen to the local interface. We must configure our MySQL server to listen to all IPs. To do this, we'll open /etc/my.cnf (or /etc/mysql/my.cnf, depending on your Linux distribution). Check to ensure it contains the following:#skip-networking # commented out! bind-address = 0.0.0.0 # Will listen on all IPs
iptables -A FORWARD -s 52.4.198.118/32 -p tcp --dport 3306 -j ACCEPT
You may have to replace FORWARD with INPUT if your Linux box has a public IP and the Database runs on the Host itself.
Your server is now set up to accept requests from our IP to your Database/ Table.
How to set up your SSL connection
It’s a good practice to secure the connection with an SSL certificate that is generated and installed on the server. Follow the steps below to do this on any recent MySQL version.
Enabling SSL using the bundle (AWS RDS)
Some of the MySQL database providers, e.g. Amazon RDS might need a different setup to use SSL, because they support certificate chain and use server side certification. By default, you don’t have access to the private key, and you’ll have to use the certificate bundle downloaded from your website.
More information on how to use SSL with AWS RDS is available on here.
AWS RDS specific prerequisites:
- First, configure your database to require SSL in your AWS console (official docs).
- The database should be publicly available, otherwise, Databox won’t be able to access it since Databox is not in your AWS security group.
- Next, download the certificate bundle for your specific AWS region (your region is visible in the AWS console).
- Important step: make sure that you check and update your security rules for inbound traffic.
Connecting MySQL source in Databox:
- Enter hostname - it should be as in AWS console with the database name in endpoint, port, user, and password
- The database name should remain blank because we combine the host and database name. If you provide a database name, the connection might not work.
- Select the "SSL with global bundle" option because AWS RDS MySQL uses server identity validation. No private key is required.
- Open the downloaded bundle *.pem file in the text editor and copy/paste the bundle certificate in the SSL CA input field.
- Select the database timezone if you want.
- Click Activate.
Enabling SSL using self-signed certificate
We’ll use the OpenSSL command line tools and our certificate will be self-signed, but feel free to use certificates from any certificate authority that is widely known and acknowledged.
openssl genrsa 2048 > ca-key.pem
openssl req -sha1 -new -x509 -nodes -days 3650 -key ca-key.pem > ca-cert.pem
openssl req -sha1 -newkey rsa:2048 -days 730 -nodes -keyout server-key.pem > server-req.pem
openssl rsa -in server-key.pem -out server-key.pem
openssl x509 -sha1 -req -in server-req.pem -days 730 -CA ca-cert.pem -CAkey ca-key.pem -set_serial 01 > server-cert.pem
cp ca-cert.pem server-cert.pem server-key.pem /etc/mysql/
ssl-ca=/etc/mysql/ca-cert.pem ssl-cert=/etc/mysql/server-cert.pem ssl-key=/etc/mysql/server-key.pem
GRANT ALL PRIVILEGES ON *.* TO ‘ssluser’@’%’ IDENTIFIED BY ‘SecurePassword’ REQUIRE SSL;
Feel free to restrict the user access further as you see fit. In most cases, user access is restricted to our IP only with SELECT permissions.
ssl-ca=/etc/mysql/ca-cert.pem ssl-cert=/etc/mysql/server-cert.pem ssl-key=/etc/mysql/server-key.pem
\s
SSL: Cipher in use is DHE-RSA-AES256-SHA
If SSL: Not in use is returned, the SSL isn't active. Please go back and re-check all steps above, or contact Support at help@databox.com for additional assistance.
SSL: Not in use
How to connect MySQL to Databox
Once our Database is properly prepared, we'll connect it to Databox.

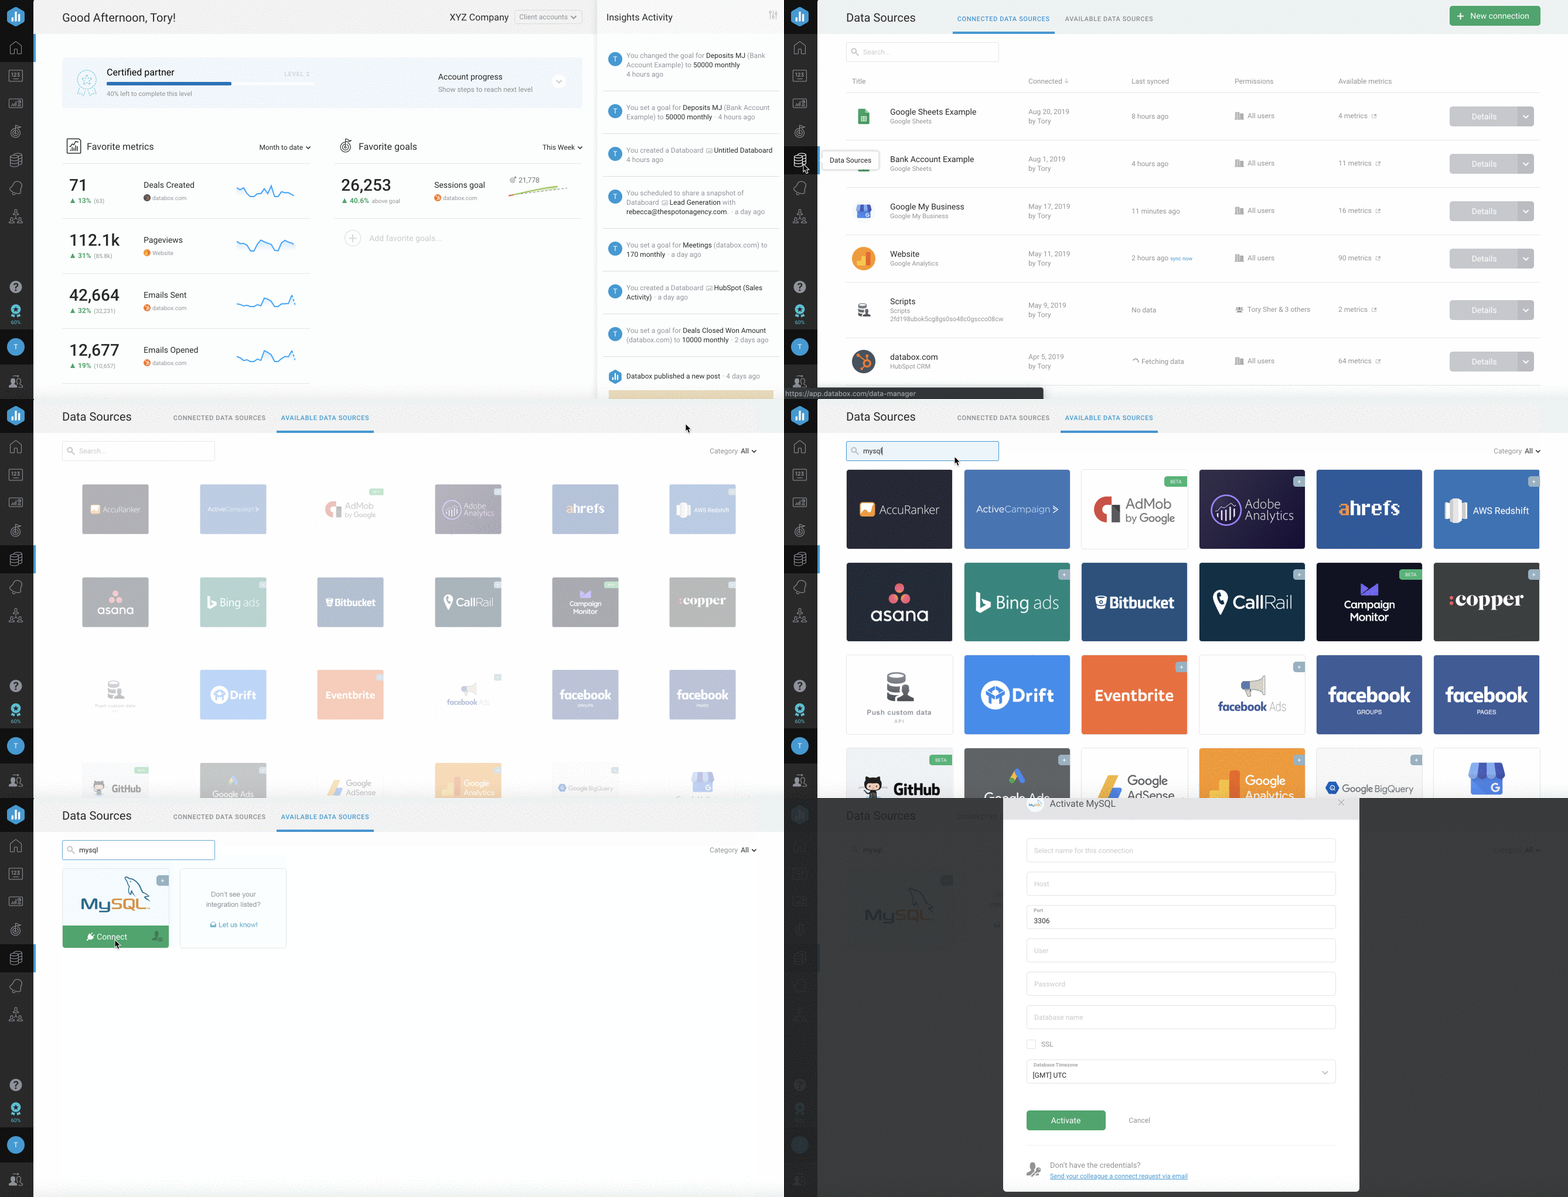
To connect MySQL to Databox, go to Data Sources > + New connection. Type MySQL in the search bar and click on the green Connect button.
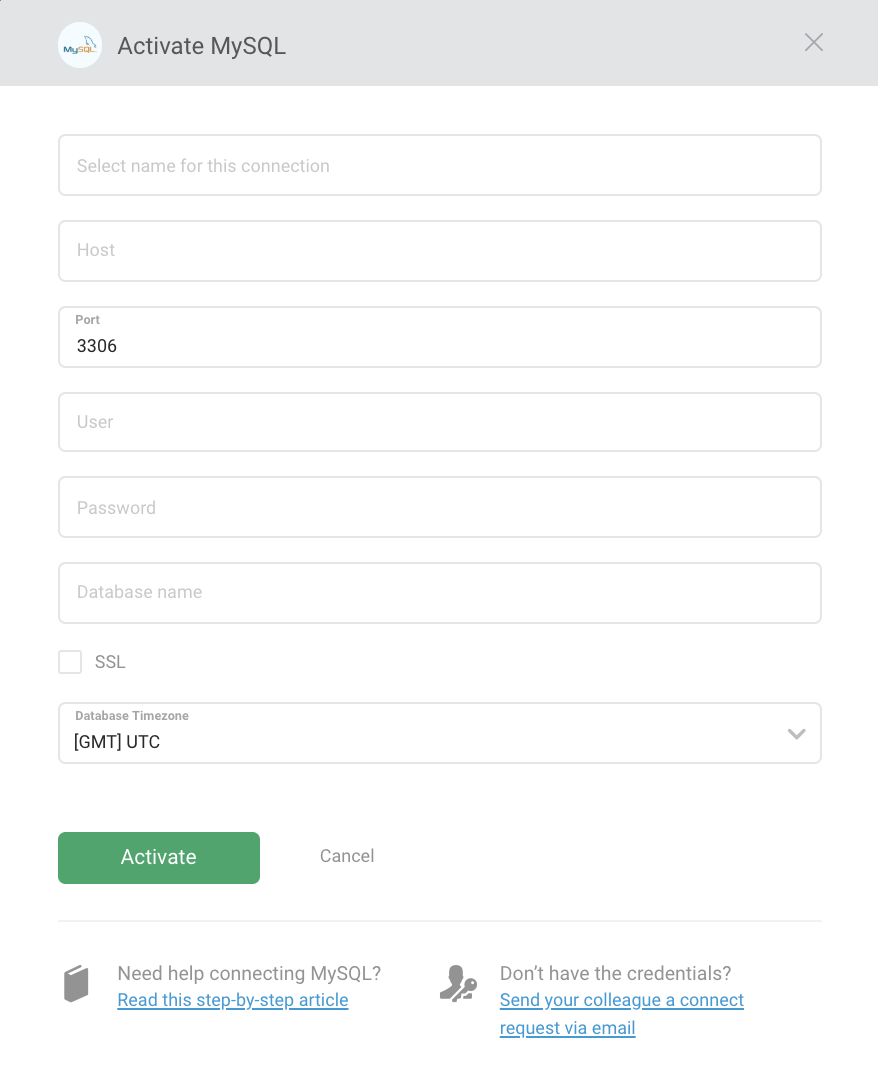
This will open the Activation window, which is where you will be prompted to enter your connection data and authorize the Databox app.
 If you have set up a SSL certificate, be sure to check the SSL checkbox and paste the certificates in the corresponding fields. SSL CA is not mandatory. If you're using a self-signed certificate, be sure to leave the SSL checkbox un-checked or the connection will fail.
Click the green Activate button to complete the connection process. If MySQL was successfully connected, the Activation window will close shortly and you'll see a Connected notice.
If you see a notice that says Wrong Credentials, double-check your user data before re-entering them in the Activation window.
If the Activation window doesn't close for over a minute, there may be difficulty connecting to your Database Host due to firewall, server, or networking issues.
If you have difficulty connecting, be sure the IP or hostname entered is publicly available or access is granted to Databox's public IP (52.4.198.118).
Pro Tip: A connection error can occur if you use some special characters in your MySQL password. Learn more here
How to use the Metric Builder for MySQL
The Metric Builder for MySQL allows you to create Custom Metrics using data from your Database to use in Databoards, Alerts, Goals, etc. Learn more about the Metric Builder for MySQL here.
Additional Information
- Make sure your Firewall is open to Databox's public IP and your Port is correctly forwarded to the server
- Query results are limited to 10 MB. If more than 10 MB of data is returned in a response to a query, an error message will be displayed in Databox. Please edit your query to successfully sync the data.
- The query must contain a column named "Date." If you need to, use AS in your SELECT statement to satisfy this requirement
- One column should always contain the Metric Value
- "Null" values will not be recognized. Use a COALESCE function when needed. Learn more here.
- A connection error can occur if you use some special characters in your MySQL password. We advise you to not use special characters from the list below, as it may cause encoding issues during the connection of the data source. Please check if the following are included in your MySQL password and replace them with other characters:
- , ' " / \ and spaces"
- , ' " / \ and spaces"