
Availability
When Databox sends automated emails the sender address reveals the underlying platform to your clients, breaking the white-labeled experience you've built. A custom email domain replaces that with your own brand, so every notification arrives from your company's address instead of Databox's. Databox authenticates your domain via CNAME records using SendGrid, which also sets up SPF and DKIM alignment to improve deliverability and keep messages out of spam.
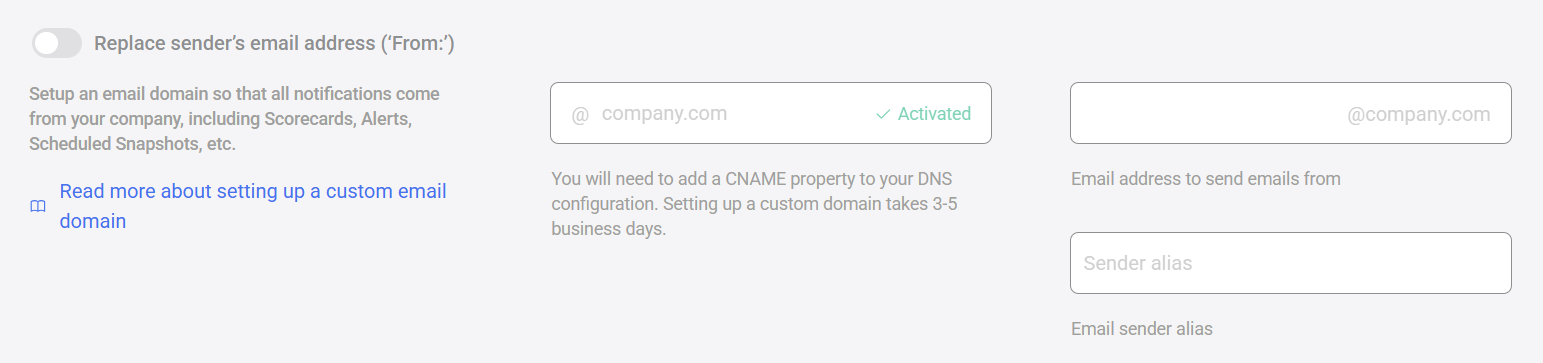
- Go to Account Management > White-labeling.
- Toggle on Replace sender's email address ('From:').
- Enter your company domain in the @ company.com field.
- Enter the full sending address in the Email address to send emails from field.
- Optionally, enter a display name in the Sender alias field.
- Click Save.
After saving, Databox will provide via email the CNAME records you need to add to your domain's DNS zone. Activation takes 3–5 business days once the records are in place.
The specific record name and target values are provided by Databox after you save your domain settings. The steps below show where to enter them for common DNS providers.
- Log in to Cloudflare and select your domain.
- Go to DNS in the top navigation.
- Click Add record.
- Select CNAME from the Type dropdown.
- Enter the record name provided by Databox (e.g.,
em1234) in the Name field. - Enter the target provided by Databox in the Target field.
- Select Auto from the TTL dropdown.
- Set Proxy status to DNS only (orange cloud icon toggled off).
- Click Save.
- Log in to GoDaddy and open your domain's DNS settings.
- Click Add and select CNAME from the Type dropdown.
- Enter the record name provided by Databox in the Host field (e.g.,
em1234). - Enter the target provided by Databox in the Points To field.
- Set TTL to your preference (e.g.,
14400). - Click Save.
- Edit the DNS zone file for your primary nameserver.
- Add the CNAME record in this format:
em1234 14400 IN CNAME u123456.wl123.sendgrid.net.Where em1234 is the record name, 14400 is the TTL, and u123456.wl123.sendgrid.net. is the target. Include the trailing period.
- Increment the zone serial number, then reload Bind:
rndc reloadOnce you've added the CNAME records, verify they're live before Databox confirms activation.
On Linux or macOS — using Terminal:
# Check CNAME record
dig em1234.your_domain.com CNAME +short

# Check A record
dig em1234.your_domain.com
Replace em1234 with your record name and your_domain.com with your domain.
A successful response returns the SendGrid target your record points to. An empty response means the record hasn't propagated yet — wait a few hours and try again.
On any OS — using a browser: Visit digwebinterface.com and query your CNAME record directly.
FAQ
Can I use any domain for the custom email sender?
Yes, as long as you have access to that domain's DNS settings to add the required CNAME records. You can use your primary company domain or a subdomain.
Do I need to set up a custom domain before setting up a custom email domain?
No. A custom domain and a custom email domain are configured separately on the White-labeling page. You can set up either one independently.
My DNS provider isn't listed here — where can I find setup instructions?
Search the web for "add CNAME record" plus your provider's name. The values to enter (record name and target) are the same regardless of provider — only the UI differs.
Why do CNAME records need to be added to my DNS?
Databox uses SendGrid for email delivery. SendGrid requires CNAME records to verify domain ownership and set up SPF/DKIM authentication — two standards that improve deliverability and prevent emails from being marked as spam.


